STARTER GUIDE
GET RUNNING IN ABOUT TWENTY MINUTES
From license key to first verified backup.
This guide walks you through everything from opening the welcome email to confirming your first successful backup and running a test restore. Follow it once, and the rest of using VaultGuard is just letting it run.
Page intro
You should have received a welcome email containing your license key and the download link. If you haven't, check your spam folder; if it's still not there after ten minutes, email customerservice@informationsecuritykentucky.com and I'll get you sorted out.
This guide covers ten steps. Most are quick. Steps 5 (picking a backup target) and 10 (running a test restore) deserve a little more attention than the others — those are where most first-time users either set themselves up for success or set themselves up for problems down the line.
Total time: roughly 20-30 minutes, most of which is VaultGuard running the first backup in the background while you do something else.
Step 1 — Download VaultGuard Backup
Click the download link in your welcome email, or visit the download page directly.
The file is VaultGuardBackup_V3.4.1exe, approximately 1MB. It's a single signed Windows executable — there's no installer wizard, no setup chain, nothing else to download.
When you run it for the first time, the app saves itself at C:\VaultGuard\backup. Downloads works for the initial launch.
Step 2 — Verify the download (optional but recommended)
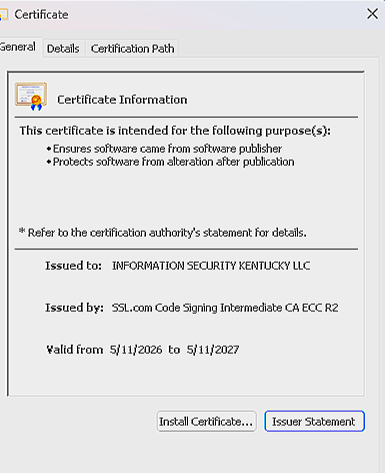
VaultGuard Backup is a security tool. Always verify a security tool's authenticity before running it. This sounds technical, but it's two clicks and a quick visual comparison. About 30 seconds total.
What we're doing: the VaultGuard release page lists a long string of letters and numbers called a SHA-256 hash. Your downloaded file has its own hash. If the two hashes match, the file is authentic. If they don't, the file has been tampered with somewhere along the way.
How to check:
Find the VaultGuardBackupV3.4.1.exe file in your Downloads folder.
Right-click the file.
Click Properties in the menu that appears.
In the Properties window, click the Digital Signatures tab.
You should see "Information Security Kentucky LLC" listed as the signer. Click on that line, then click Details.
The signature should say "This digital signature is OK."
If the digital signature is valid and shows Information Security Kentucky LLC as the signer, you have an authentic VaultGuard binary. The file came from me, hasn't been modified since I signed it, and is safe to run.
If the Digital Signatures tab is missing, or shows a different signer, or says the signature is invalid — do not run the file. Email customer service at customerservice@informationsecuritykentucky.com and we'll figure out what happened.
For the more technical: if you want to verify the SHA-256 hash directly instead of using the digital signature, the download page lists the hash for the current release, and Windows includes a built-in command (certutil -hashfile) that produces the hash of any file. The digital signature check above is the simpler, more reliable option for most users.
Step 3 — Run VaultGuard for the first time
Double-click VaultGuardBackupV3.4.1.exe.
You may see a Windows SmartScreen warning that says "Windows protected your PC." This is a temporary side effect of being a newly-signed application — Windows hasn't yet built up enough reputation for the binary to suppress the warning. It does NOT mean the file is malicious.
If you see this warning:
Click More info (the small text link near the bottom of the warning)
Click Run anyway to launch VaultGuard
This will become unnecessary as VaultGuard's signing certificate accumulates reputation across many installations.
Windows will then ask for administrator permission. VaultGuard requires administrator access because it interacts with wbadmin
(Windows' built-in backup tool), Windows Task Scheduler, and Windows Defender — all of which require elevation. Click Yes to allow.
VaultGuard will:
Create its runtime directory at C:\ProgramData\VaultGuard\Backup\ with locked-down ACL permissions.
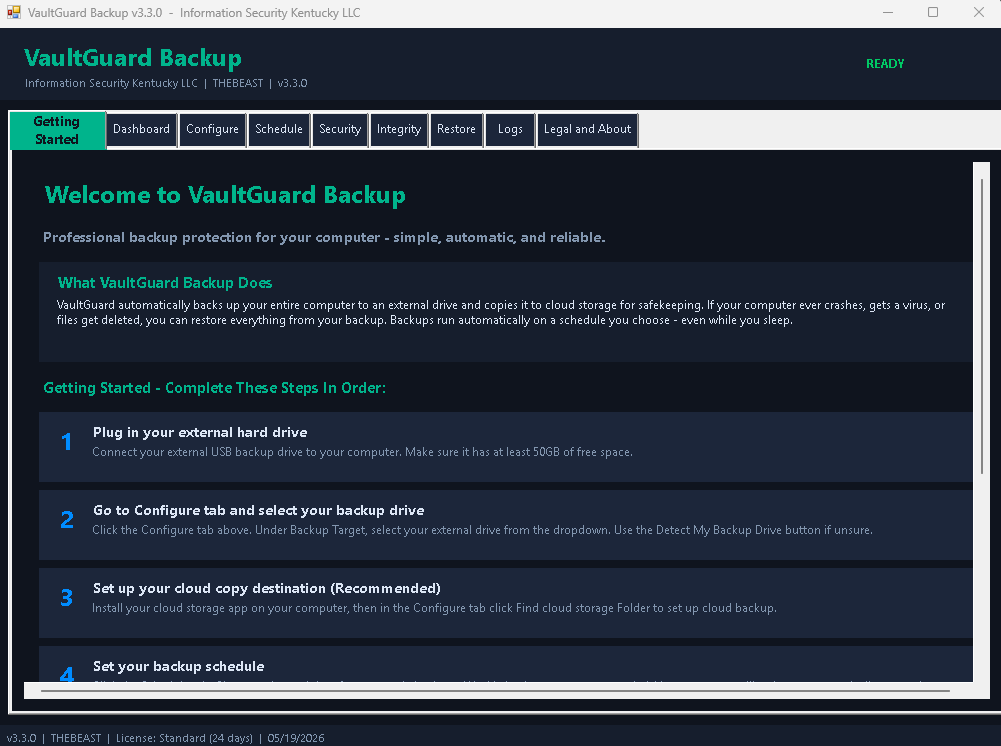
Create shortcuts located on the computer Desktop and the Start Menu.
Open the main interface to the Getting Started tab.
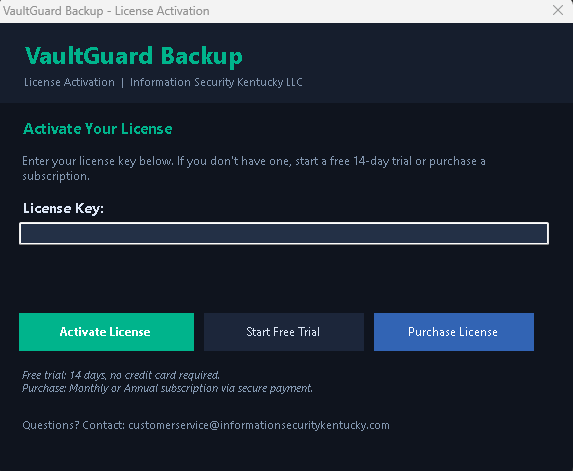
Step 4 — Enter your license key
On first launch, VaultGuard prompts you to enter your license key. Look for the License or Activation screen.
Copy your license key from the welcome email. It looks like a long string of letters, numbers, and hyphens — six groups separated by dashes, with the last group shorter than the rest (e.g., XXXXXX-XXXXXX-XXXXXX-XXXXXX-XXXXXX-XX).
Paste it into the activation field. A common gotcha: copying from email sometimes pulls extra whitespace at the beginning or end. If activation fails, try
retyping the key character by character, click and drag the mouse until all characters are highlighted and make sure no stray whitespace got included.
VaultGuard Backup will validate the key against the license server. If everything's right, your trial activates and the Getting Started tab opens up.
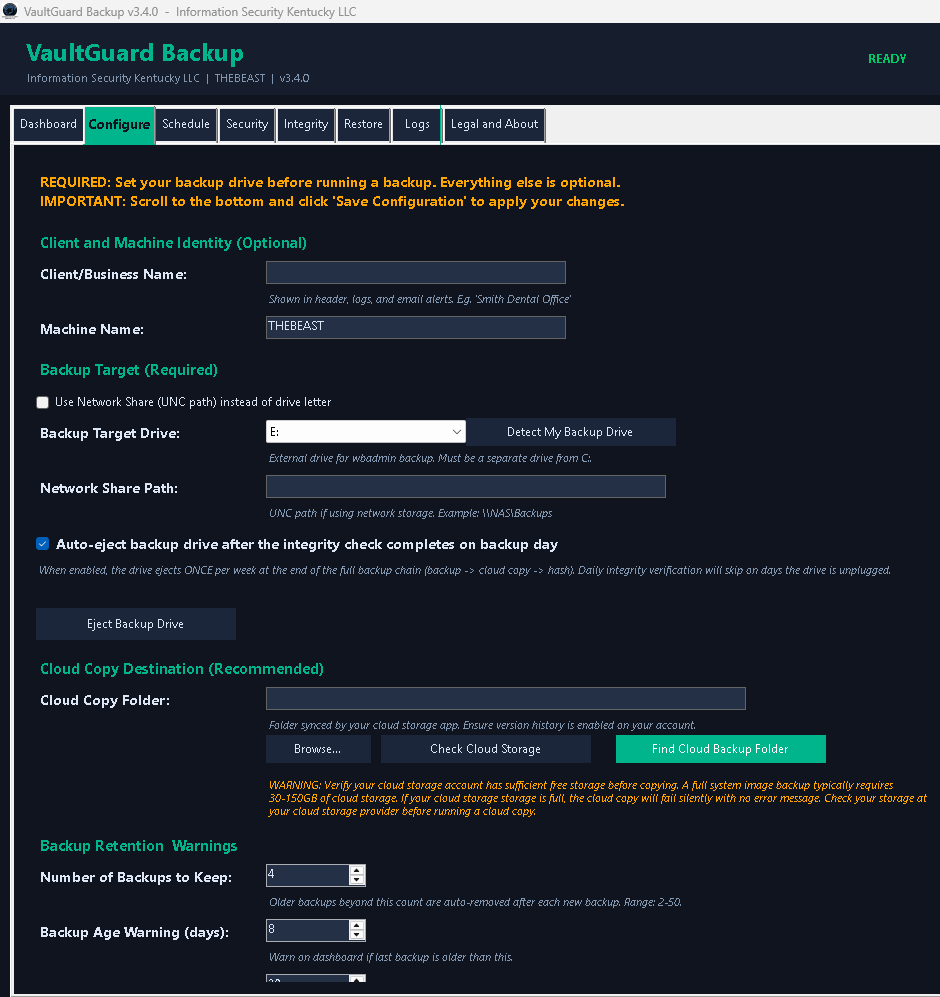
Step 5 — Pick a backup target
This is the most important configuration decision you'll make. The backup target is where your data goes.
VaultGuard supports three kinds of targets:
External USB drive (recommended for most users). A dedicated drive that's connected when backups run and disconnected the rest of the time.
Physical separation from your main machine is the strongest defense against ransomware. After each backup, VaultGuard's auto-eject feature can
disconnect the drive automatically once the cloud copy is complete.
Internal drive or partition. A second drive inside your computer, or a separate partition on your main drive. Faster than USB but less protection against viruses and ransomware (which can encrypt internal drives). Acceptable if combined with off-site cloud copy.
Network share. A NAS, file server, or shared folder on another machine. Useful for environments where the backup needs to live somewhere central. Make sure the share is properly authenticated and that the account VaultGuard Backup runs under has write access.
For first-time setup, a dedicated external USB drive is the cleanest choice. Get a drive that's at least 1.5 to 2 times the size of the data you want to back up — system image backups need room for multiple versions plus working space.
In the Getting Started tab, click Detect My Backup Drive to have VaultGuard Backup identify connected external drives automatically. Confirm the right one is selected.
Important: the drive should be formatted as NTFS. FAT32 has file size limitations that will break large system images. exFAT is workable but NTFS is recommended.
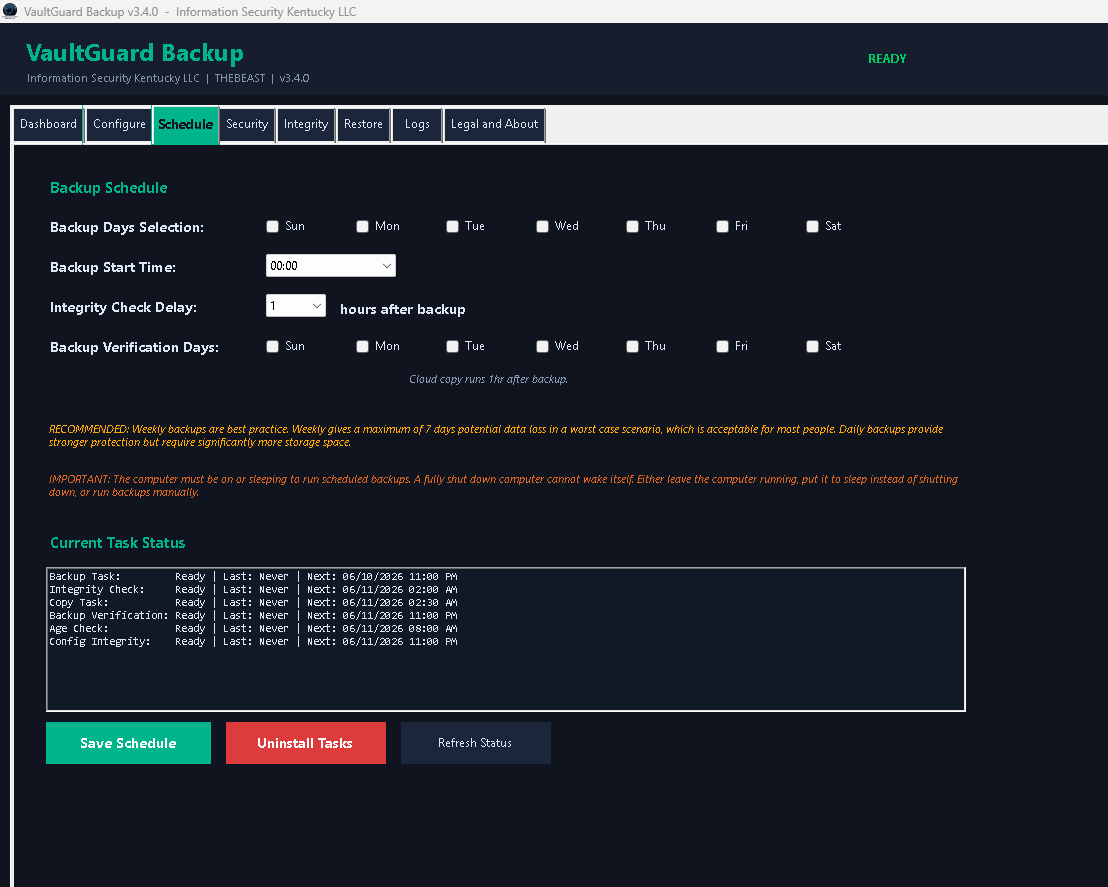
Step 6 — Pick a backup schedule
VaultGuard Backup runs full system image backups via wbadmin. These are thorough but take time — typically 30 minutes to several
hours depending on how much data you have.
Recommended default: weekly, off-hours.
Pick a time when your computer is on but you're not actively using it. Most users pick something like Saturday or Sunday at 2 AM.
The integrity check should be set to run a few hours after the backup completes (configurable in the Schedule tab).
Wake-To-Run. If your computer is set to sleep at night, VaultGuard Backup's scheduled task can wake it briefly to run the backup. This is enabled by default and is what you want — otherwise the scheduled backup won't run if the machine is asleep at the scheduled time.
Pick the days that work for you — anywhere from one day per week to six. Verification runs the day before your earliest backup day, by default, but you can select any day that you aren’t creating a backup.
For most users, weekly backups are the right balance: frequent enough to limit data loss, infrequent enough not to wear out the drive or fragment your time.
Step 7 — Configure the cloud copy (optional but strongly recommended)
A backup that only exists on a USB drive sitting next to your computer is one fire, flood, or theft away from being gone.
The cloud copy gives you off-site protection.
VaultGuard Backup works with any cloud storage provider that has a Windows desktop sync app. The auto-detect feature finds the most common ones — Google Drive, OneDrive, Dropbox, Box, and iCloud Drive. For other providers (pCloud, Sync.com, etc.), the cloud copy still works fine — you'll just point VaultGuard Backup, manually, at the local folder your provider syncs.
Setup:
Make sure your cloud sync app is installed, signed in, and has selected a folder on your local drive that it syncs to the cloud
In VaultGuard Backup's Getting Started tab, click Find Cloud Backup Folder to have VaultGuard Backup auto-detect your cloud sync folder
Pick the right folder if multiple are detected
Click Check Cloud Storage to verify the folder is being actively synced
VaultGuard will copy each completed backup to the cloud sync folder, and your cloud provider's sync app will mirror it to the cloud
automatically. From there, you can layer on a second cloud-to-cloud sync service (MultCloud, rclone, or similar) for an off-site copy
at a different provider — but that's an optional advanced setup, not required.
Step 8 — Set up email alerts (optional but recommended)
VaultGuard can email you when:
A backup completes successfully
A backup fails for any reason
The integrity check 24 hours later passes or fails
A drive health warning is detected
A configuration change occurs
Your backups haven't run within the configured threshold (daily age check)
You don't need to provide SMTP credentials. VaultGuard Backup's email alerts are routed through a managed relay — you
just provide the recipient email address, and the alerts come from customerservice@informationsecuritykentucky.com.
In the Getting Started tab's email configuration section:
Enter the email address where alerts should be sent (this is usually your own primary email).
Click Send Test Email to confirm the connection works.
Toggle whether you want to receive alerts, other than security alerts.
A note about security alerts: certain alerts always send regardless of your toggle settings. These cover situations you can't afford to silence yourself out of — passphrase lockout, ransomware detection in a backup, integrity check failure, configuration tampering, drive health warnings, and threats detected during the pre-backup scan. This is by design, not a bug.
Important: the contents of alert emails pass through our infrastructure on the way to your inbox. The contents of your backups themselves never leave your computer. The full disclosure is in the Privacy Policy. If your business has compliance requirements that prohibit alert metadata from passing through a third-party relay, leave email alerts disabled.
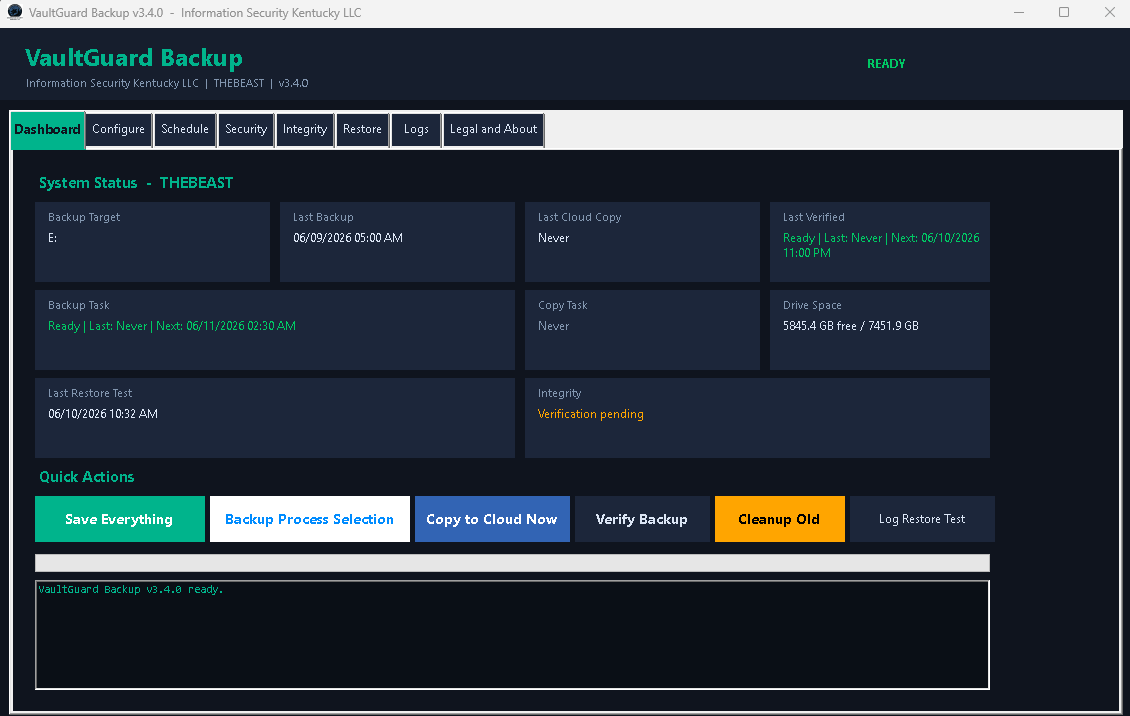
Step 9 — Run your first backup
Click Backup Process Selection in VaultGuard's main interface and select which processes to run, choosing between Full Process, Backup + Integrity, or Backup Only to kick off your first backup manually, rather than waiting for the scheduled time.
Expect the first backup to take longer than subsequent ones because it's creating a complete system image. For a typical Windows
installation with 100-300 GB of data, plan for 30-90 minutes depending on drive speed.
While the backup runs:
Your computer remains usable, but disk-heavy work will be slower than usual
VaultGuard's status display shows progress
You can do other things; the backup runs in the background
During the integrity check that follows, the Integrity tab shows live read speed (MB/s) and estimated time remaining — handy for confirming the multi-hour runs are progressing normally rather than wondering if the bar froze
When the backup completes, VaultGuard:
Generates the SHA-256 manifest of every backed-up file (Integrity code)
Begins copying to your cloud sync folder (if configured)
Logs the result and (if configured) sends you a success email
24 hours after the backup completes, VaultGuard automatically runs the integrity check and verifies every file in the backup against the manifest. If verification passes, you've confirmed the backup is restorable.
Step 10 — Run a test restore
This is the single most important step in this entire guide.
A backup you've never tested isn't a backup. It's a hope.
Test that you can restore a single file before you ever need to recover from a real disaster. The test takes about three minutes and confirms that every link in your backup chain is working.
In VaultGuard Backup's Restore tab:
Click File-Level Restore
Browse to a file in the backup — pick something easy to identify, like a document on your desktop
Click Restore and choose a destination folder (NOT the original location, so you can compare) (Default is C:\RestoredFiles)
Watch the ‘Pre-Restore’ integrity check before the restore (To verify nothing has changed in the file/folder)
Wait for the restore to complete
Open the restored file and confirm it matches the original
Go to the Dashboard and click Log Restore Test to record that you successfully completed a test. This timestamps the test so VaultGuard Backup knows when you last verified recoverability.
If this test succeeds, your backup is real. You've confirmed the storage works, the manifest verifies, the restore process functions, and your data is genuinely recoverable.
Plan to repeat this test every couple of months. If you go more than 90 days without logging a restore test, VaultGuard Backup will display a "Restore Test Overdue" reminder the next time the app launches — this aligns with NIST guidance and most compliance frameworks that require periodic restore testing to confirm backup recoverability. After completing the test, click Log Restore Test on the Dashboard so the clock resets.
You're done!
VaultGuard Backup is now configured, your first backup is in place, and you've confirmed it works. From here on, VaultGuard Backup runs on its schedule. You'll get email alerts (if configured) when something needs your attention.
A few things worth doing in the next few days:
Check your email alerts. When the first scheduled backup runs, confirm the success alert arrives.
Check the integrity verification result. The day after the first scheduled backup, confirm the integrity check passed.
Optional: explore the other tabs. The Configure tab has every setting available, including the optional administrator passphrase and 2FA features for users who want extra security or compliance.
*Help*
Anything in this guide unclear or not working? Email customerservice@informationsecuritykentucky.com and I'll either help you directly or update this guide so the next person finds the answer faster.
For more in-depth questions, the Documentation overview lists every topic, and the Support page covers the full support process.
Back to Documentation · VaultGuard Backup product page · Email customer service